The article shows how to create an Excel drop down that allows users to select multiple items with or without duplicates.
Excel has come a long way since its inception and introduces more and more useful features with each new release. In Excel 365, they've added the ability to search within data validation lists, which is a huge time-saver when working with large sets of data. However, even with this new option, out-of-the-box Excel still only allows selecting one item from a predefined list of options. But fear not, as there is a solution. By using VBA, you can create drop-down lists with multiple selections. With the ability to prevent duplicates and remove incorrect items, this feature can streamline data input and improve accuracy in your Excel spreadsheets.
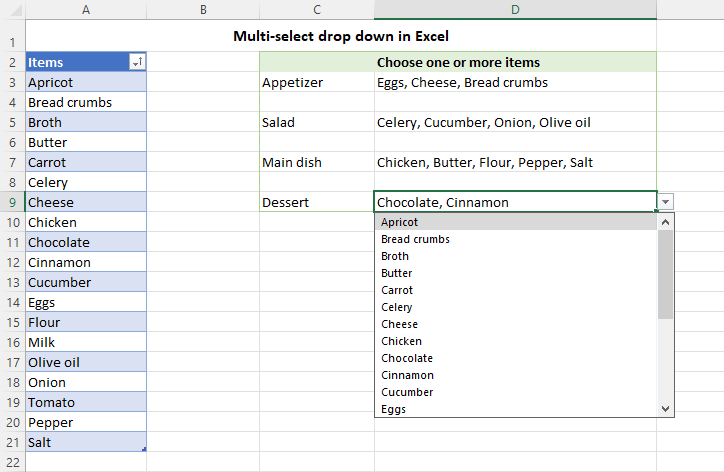
How to make Excel drop down with multiple selections
Creating a multi-select drop down list in Excel is a two-part process:
- First, you make a regular data validation list in one or more cells.
- And then, insert the VBA code at the back end of the target worksheet.
It also works in the reverse order :)
Create a normal drop-down list
To insert a drop down list in Excel, you use the Data Validation feature. The steps slightly vary depending on whether the source items are in a regular range, named range, or an Excel table.
From my experience, the best option is to create a data validation list from a table. As Excel tables are dynamic by nature, a related dropdown will expand or contract automatically as you add or remove items to/from the table.
For this example, we are going to use the table with the plain name Table1, which resides in A2:A25 in the screenshot below. To make a picklist from this table, the steps are:
- Select one or more cells for your dropdown (D3:D7 in our case).
- On the Data tab, in the Data Tools group, click Data Validation.
- In the Allow drop-down box, select List.
- In the Source box, enter the formula that indirectly refers to Table1's column named Items.
=INDIRECT("Table1[Items]")
- When done, click OK.
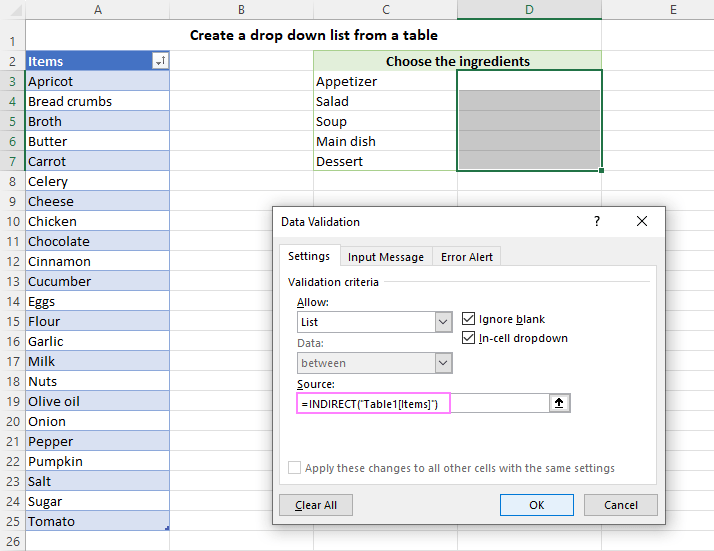
The result will be an expandable and automatically updatable drop-down list that only allows selecting one item.
Tip. If the method described above is not suitable for you for some reason, you can create a dropdown from a regular range or named range. The detailed instructions are here: How to create Excel data validation list.
Insert VBA code to allow multiple selections
This is the core part of the process that does the magic. To turn a regular single-selection picklist into a multi-select dropdown, you need to insert one of these codes in the back end of your target worksheet:
- VBA code for multi-select drop down with duplicates
- VBA code for multi-select drop down without duplicates
- VBA code for multi-selection dropdown with item removal
To add VBA code to your worksheet, follow these steps:
- Open the Visual Basic Editor by pressing Alt + F11 or clicking the Developer tab > Visual Basic. If you don't have this tab on your Excel ribbon, see how to add Developer tab.
- In the Project Explorer pane at the left, double-click on the name of the worksheet that contains your drop-down list. This will open the Code window for that sheet.
Or you can right-click the sheet's tab and choose View Code from the context menu. This will open the Code window for a given sheet straight away.
- In the Code window, paste the VBA code.
- Close the VB Editor and save your file as a Macro-Enabled Workbook (.xlsm).
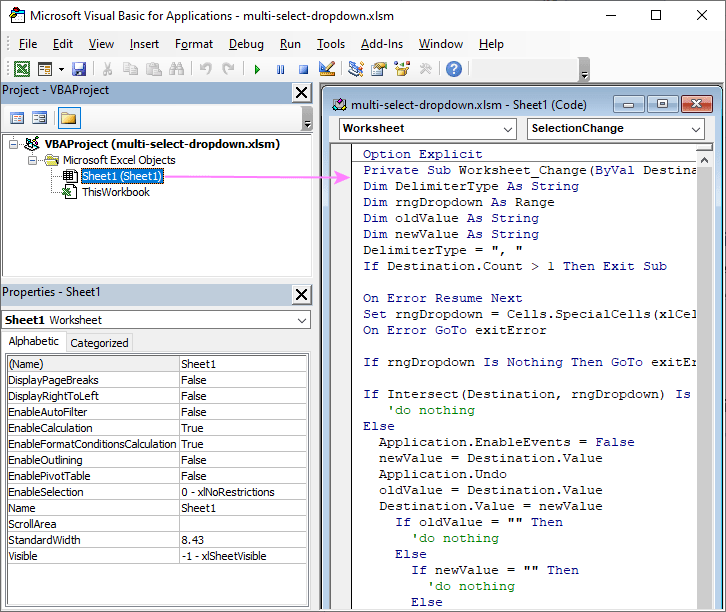
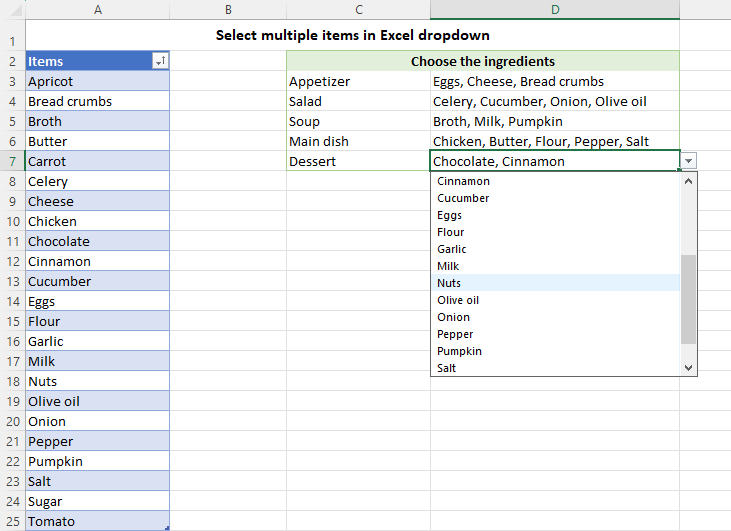
That's it! When you go back to the worksheet, your drop-down list will allow you to select multiple items:
VBA code to select multiple items in dropdown list
Below is the code to make a data validation list that allows selecting multiple items, including repeated selections:
How this code works:
- The code enables multiple selections in all drop down lists on a particular sheet. You do not need to specify the target cell or range reference in the code.
- The code is worksheet specific, so be sure to add it to each sheet where you want to allow multiple selections in drop down lists.
- This code allows repetition, i.e. selecting the same item several times.
- The selected items are separated with a comma and a space. To change the delimiter, replace ", " with the character you want in DelimiterType = ", " (line 7 in the code above).
Note. The same character cannot be used as both the delimiter and part of the dropdown items. In our code, the default delimiter is a comma followed by a space (", "), so this combination of characters should not appear anywhere within the dropdown items themselves to avoid conflicts. If you change the delimiter to a single space (" "), bear in mind that the code will only function correctly for single-word items, failing to handle multi-word items containing spaces.
Excel multi-select dropdown without duplicates
When selecting from a large list, users can sometimes pick the same item more than once without noticing. The code below solves the problem of duplicates in a multi-selection data validation drop down list. It lets users pick a particular item only once. If you try to select the same item again, nothing will happen. Pretty cool, right?
Multi-selection dropdown with item removal
When users need to select multiple options but can make mistakes or change their minds during the selection process, a multi selection dropdown that allows for the removal of incorrect items can be a lifesaver.
Consider a scenario where you need to assign multiple tasks to team members using a drop-down list. With Excel's default functionality, the only way to remove an incorrectly assigned task is by clearing the entire contents of the cell and starting over. With the ability to remove individual items from the selection, the team can effortlessly modify task assignments without confusion or errors.
The code below implements the item removal functionality in a simple and intuitive way: the first click on an item adds it to the selection, and a second click on the same item removes it from the selection.
The below demo highlights how the multi selection dropdown with removal functionality works in Excel. The users can select multiple options from the data validation list and make adjustments on the fly. A streamlined and effective approach to managing selections!
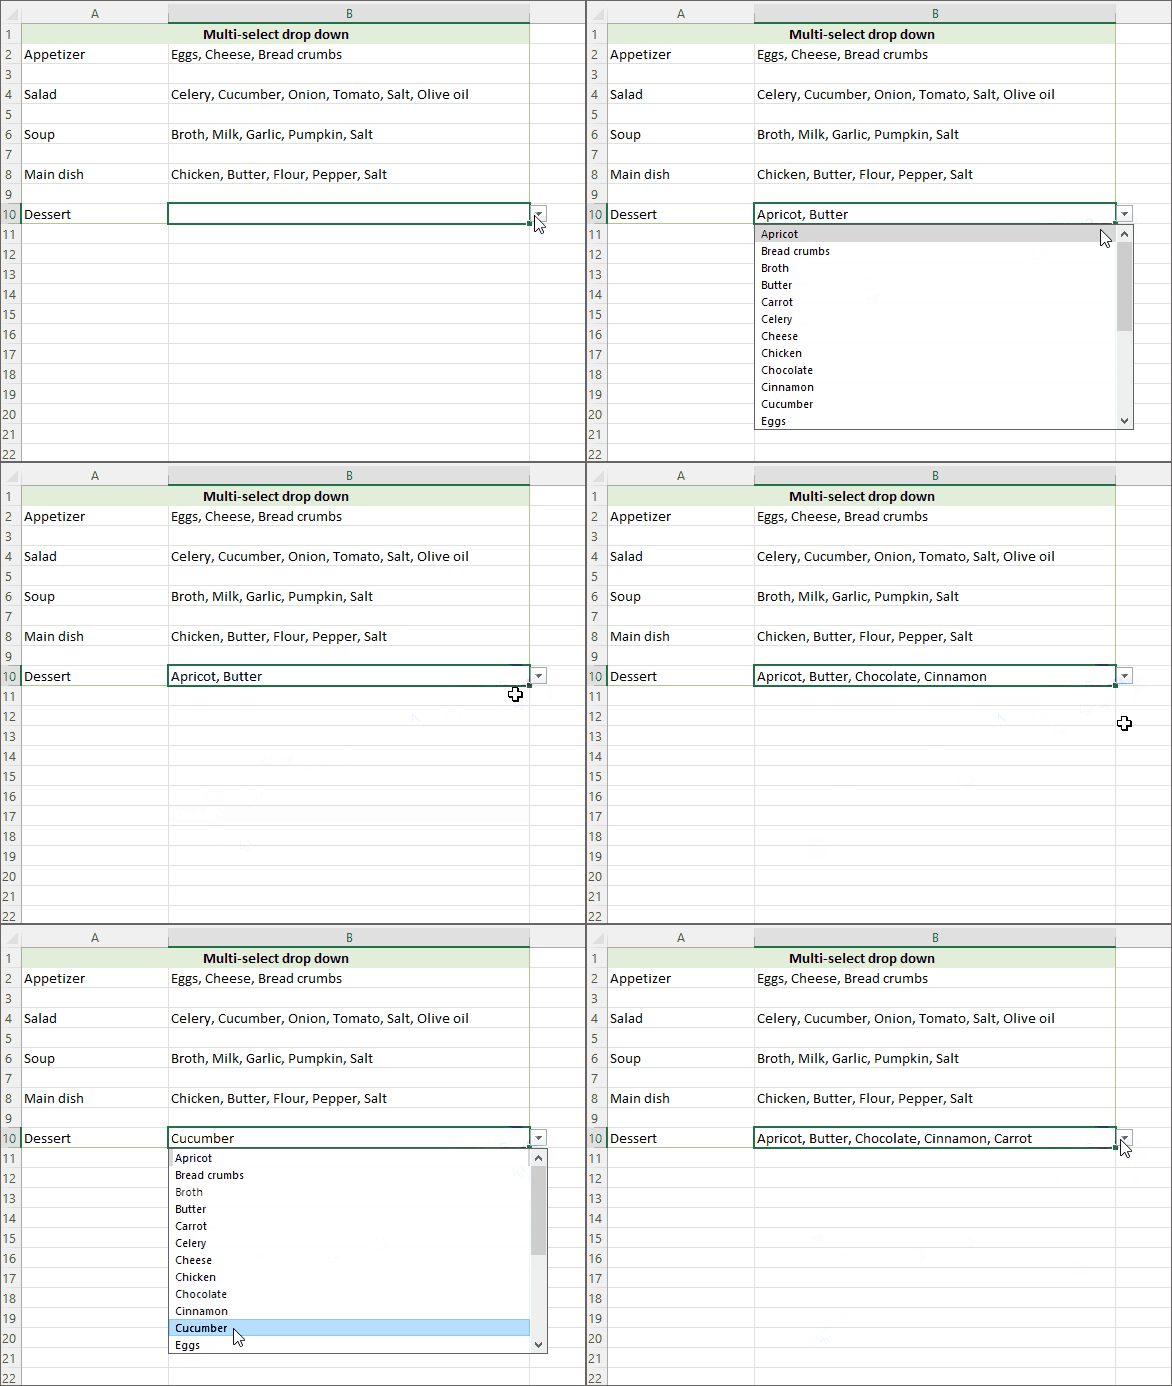
How to make a multiple selection dropdown with custom delimiter
The character that separates items in the selection is set in the DelimiterType parameter. In all the codes, the default value of this parameter is ", " (a comma and a space) and it is located in line 7. To use a different separator, you can replace ", " with the desired character. For instance:
- To separate the selected items with a space, use DelimiterType = " ".
- To separate with a semicolon, use DelimiterType = "; " or DelimiterType = ";" (with or without a space, respectively).
- To separate with a vertical bar, use DelimiterType = " | ".
For example, if you change the delimiter to a vertical slash, your multi-select picklist will look as follows:
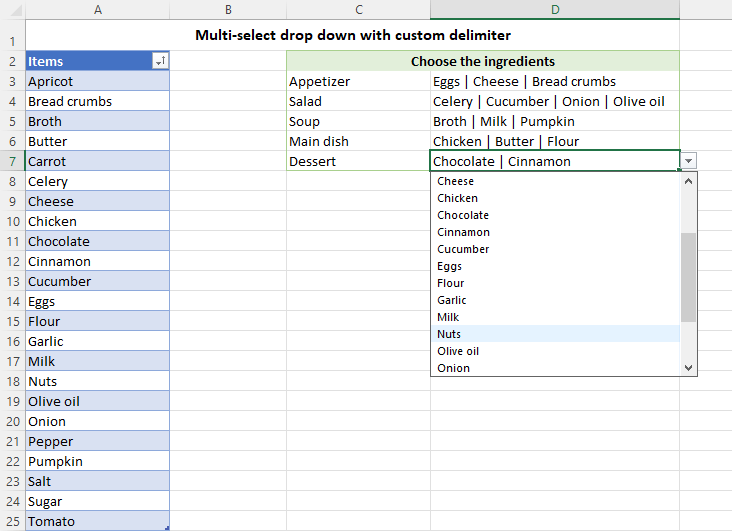
How to create dropdown with multiple selections in separate lines
To get each selection in a separate line in the same cell, set DelimiterType to Vbcrlf. In VBA, it is a constant for the carriage return and line feed characters.
More precisely, you change this code line:
DelimiterType = ","
to this one:
DelimiterType = vbCrLf
As a result, each item that you select from the dropdown list will appear in a new line:
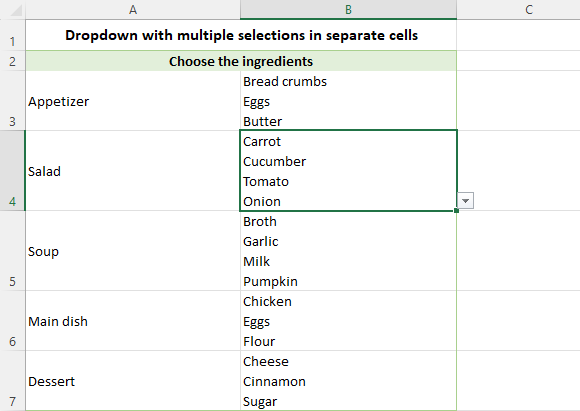
How to create multi-select dropdown for specific columns, rows, cells and ranges
All the codes described in this tutorial work across an entire sheet. However, you can easily modify any of the codes, so it only applies to specific cells, rows, or columns as needed. For this, find this line of code:
If rngDropdown Is Nothing Then GoTo exitError
Add immediately after it, add a new line specifying where to allow multiple selections, as explained in the below examples.
Multi-select drop-down for specific columns
To allow selecting multiple items in a certain column, add this code:
If Not Destination.Column = 4 Then GoTo exitError
Where "4" is the number of the target column. In this case, the multi-select dropdown will be only enabled in column D. In all other columns, dropdown lists will be limited to a single selection.
To target several columns, specify their numbers using this code:
If Destination.Column <> 4 And Destination.Column <> 6 Then GoTo exitError
In this case, the multi-select dropdown will be available in columns D (4) and F (6).
Multi-selection dropdown for certain rows
To insert multiple drop-downs in a specific row, use this code:
If Not Destination.Row = 3 Then GoTo exitError
In this example, replace "3" with the row number where you want to enable multi-select dropdowns.
To target multiple rows, the code is as follows:
If Destination.Row <> 3 And Destination.Row <> 5 Then GoTo exitError
Where "3" and "5" are the rows where selecting multiple items is allowed.
Multiple selections in specific cells
To enable multiple selections in particular cells, add one of the below code lines.
For a single cell:
If Not Destination.Address = "$D$3" Then GoTo exitError
For multiple cells:
If Destination.Address <> "$D$3" And Destination.Address <> "$F$6" Then GoTo exitError
Just remember to replace "$D$3" and "$F$6" with the addresses of your target cells.
Multi-select drop-down for specific range
To limit your multi-select dropdown to a particular range, replace this line of code:
If Intersect(Destination, rngDropdown) Is Nothing Then
with this one:
If Intersect(ActiveCell, Range("C3:D10")) Is Nothing Or Intersect(Destination, rngDropdown) Is Nothing Then
The range of interest is specified directly in the code (C3:D10 in the above example). This modification offers a more efficient approach to handing ranges - instead of individually listing 16 cells, you use a single range reference.
How to enable multi-selection functionality in protected sheet
To enable a multi-select dropdown functionality in a protected worksheet, simply insert the following code into the sheet where you've added the primary code.
Before adding this code to your worksheet, remember to replace "password" with the actual password you used to protect the sheet. And this is the only change that needs to be made. The code will automatically detect the presence of a dropdown list in a given cell and allow editing of that cell. In all other cells, editing will remain restricted.
Note. Please be aware that including your real password in the code could lead to a security risk. To ensure the safety of your workbook, store it in a secure location that is protected against unauthorized access or use.
So, there you have it - an Excel dropdown list with multiple selections. Adding this awesome feature to your spreadsheets will increase the accuracy of your data input and help you get your work done faster!
Practice workbook for download
Multi-selection dropdown - examples (.xlsm file)
 by
by
503 comments
I have two columns that have are using a drop down list and the code is working on one of the columns but not on the other. Is there something I am missing? My understanding is the code should work on any lists on the sheet?
Hi! I don't know what code you have installed. The article above suggests codes that work on entire worksheet, but can also work in individual columns, rows and cells: Multi-select dropdown for specific columns, rows, cells and ranges.
I can't get the code to work (multi select with delete) when I have the worksheet protected. I added the password sub code you provided to the Sheet2 code (pasted between Option Explicit and Private Sub Worksheet_Change(ByVal Destination As Range)). Is there anything I need to add to UserInterfaceOnly to get this to work?
Hi! It is enough to follow all the instructions given in the article above. Or use the sample file from the link at the end of the article.
Hmm. I have tried it several times and can't get the code to work, even on the sample file. I can only ever select one item from the drop down when the form is protected. Are there any other trouble shooting areas I can look to?
Hi! Unfortunately, I can't check the code in your workbook. All necessary instructions are in the article above.
Hello, thanks for this detailed explanation. It is very helpful. I am using the VBA code to select multiple items in dropdown list. I was wondering if there is a way to count how many times each word/slection is used. I tried using the =COUNTIF but as soon as a word/slection is repeaded from the dropdown list, it brings the count to 0.
Hi! Drop-down list creates a text string in the cell. Here is the guide that may be helpful to you: How to count specific words / text in a cell.
Hello, thantks for the content, is very well written and the code works perfectly.
I have one question, is it possible to filter those informations inividually? Because by using your code I've noticed that the informations are classified as one new variable, but I would like to obtain a filter in the colum that would get for me all the lines that have "eggs" for example. How can I do it?
Thanks
Hello Michel!
A drop-down list creates a text string in a cell. You can filter these text strings by partial match using an Excel Filter. For more information, please visit: Excel Filter: How to add, use and remove.
Hello! This isn't working for me... Does the data validation have to be in the same sheet as the drop down menu? I used the additional code: "If Not Destination.Column = 4 Then GoTo exitError" in the correct sheet and column but it won't apply to the drop down menu.
Hello! Unfortunately, I have no way of knowing what you did or how you did the code installation. The code should be on the same sheet as the drop-down list. Follow the instructions carefully, or you can download the sample file at the end of the article.
Sorry. I have one more question. Can I use two different codes on the same sheet (i.e., multiple selection dropdown with removal for cells C:10:D50 AND a multiple selection dropdown with repetition for cells H10:H50). I can get the first own working, but when I drop the code for the second one, nothing works. I know it's in the code but I just don't know how to fix it. Thanks
As I answered earlier, there can only be one code on an Excel worksheet.