In this article, we will explore various methods to insert columns in Excel, ranging from simple right-click options to VBA macro for adding every other column automatically.
Whether you need to add more data to your report, rearrange existing columns in your table, or create space for new information, knowing how to insert a column is a crucial skill. As one of the most frequently performed operations in Microsoft Excel, inserting columns can be performed with various methods that cater to different user preferences. In this comprehensive guide, we will explore different approaches, ranging from simple right-click options to more advanced methods like dragging, fill handle, and VBA.
How to add a column in Excel
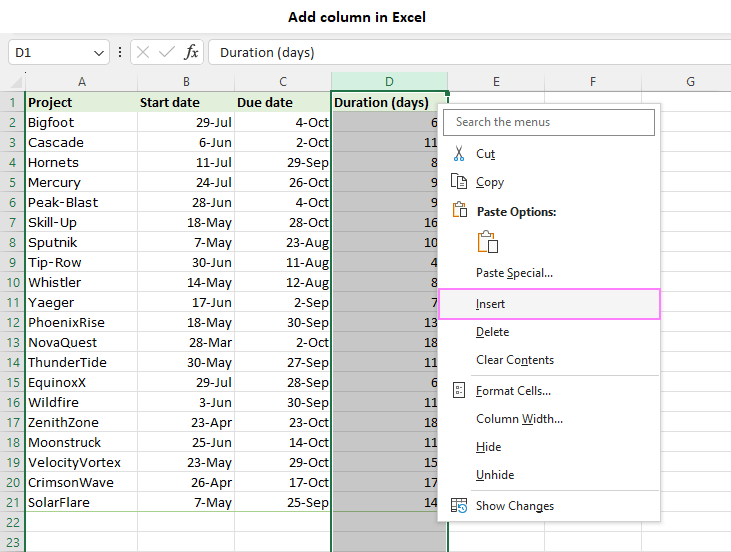
The traditional and most straightforward way to add a column in Excel is by using the right-click menu. Follow these steps:
- Select a column to the left of which you want to insert a new one. To highlight the entire column, click on the column header.
- Right-click on the selected column to open the context menu.
- Choose Insert from the menu options.
Done! A new column will be added to the left of the selected column, causing the existing columns to shift to the right.
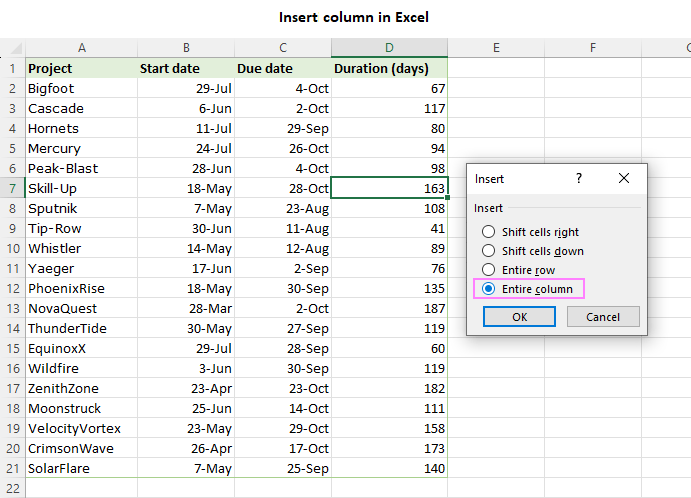
Another way to insert columns in Excel is by selecting a single cell, and then using the right-click menu. Here's how:
- Right-click on any cell in the column.
- From the context menu that appears, select the Insert command.
- In the Insert menu that opens, choose the Entire column option and click OK.
Whichever method you use, you will notice the Insert Options button that appears next to the newly added column. This button provides three useful formatting options:
- Format Same As Left - the newly inserted column will inherit the formatting of the column to its immediate left (default). This is helpful when you want consistent formatting across adjacent columns.
- Format Same As Right - the newly inserted column will adopt the formatting of the column to its immediate right. This is also useful when you want the formatting of adjacent columns to match.
- Clear Formatting - will remove all formatting attributes, such as font styles, borders, and background colors, from the inserted column.
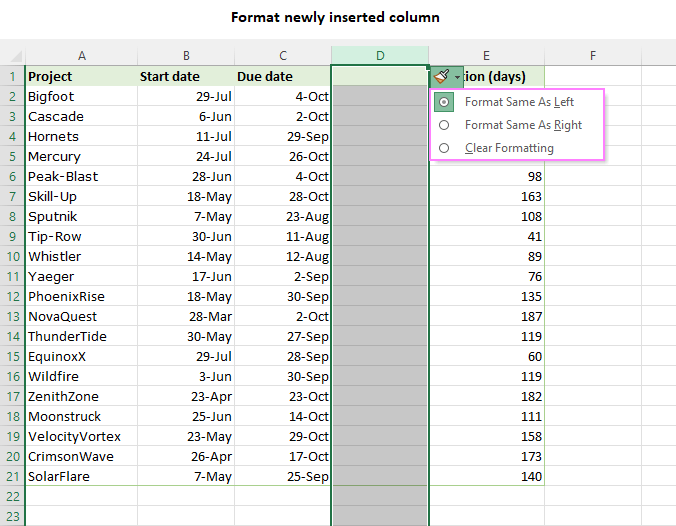
By utilizing these formatting options, you can easily manage the appearance of your spreadsheet as you insert new columns.
Insert a column in Excel using the ribbon
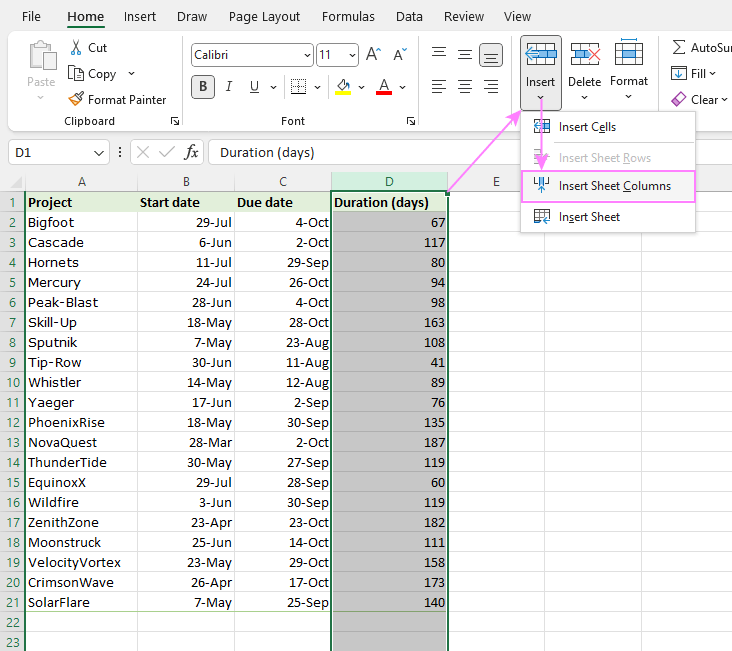
Excel Ribbon provides a range of options for quick data manipulation. To insert a new column using the ribbon button, this is what you need to do:
- Select the column next to where you want to insert the new column.
- On the Home tab, in the Cells group, click on the Insert dropdown arrow.
- Select Insert Sheet Columns from the menu.
Excel will immediately insert a new column to the left of the selected one.
Insert column shortcut
Inserting a column in Excel can be accomplished swiftly with a keyboard shortcut. Follow these steps for a quick and simple way to add a new column:
- Click on the letter button of the column immediately to the right of where you want to insert the new column.
- Press the Ctrl + Shift + Plus sign keys simultaneously on the main keyboard or Ctrl + Plus on the numerical pad.
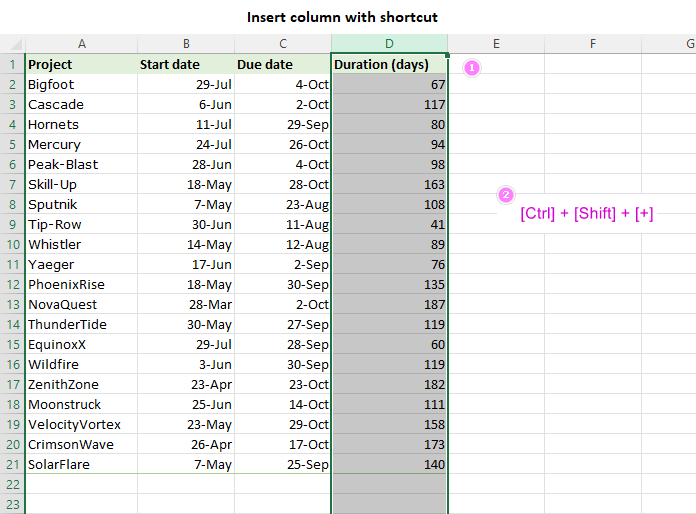
As with the previous methods, a new column will be inserted pushing the existing columns to the right.
Tip. More helpful keyboard shortcuts can be found in 30 most useful Excel keyboard shortcuts.
How to insert multiple columns in Excel
Adding multiple columns in Excel can be done without the need to insert each one individually. Here's a more productive approach to inserting multiple columns at once:
Method 1. Add multiple columns with right-click
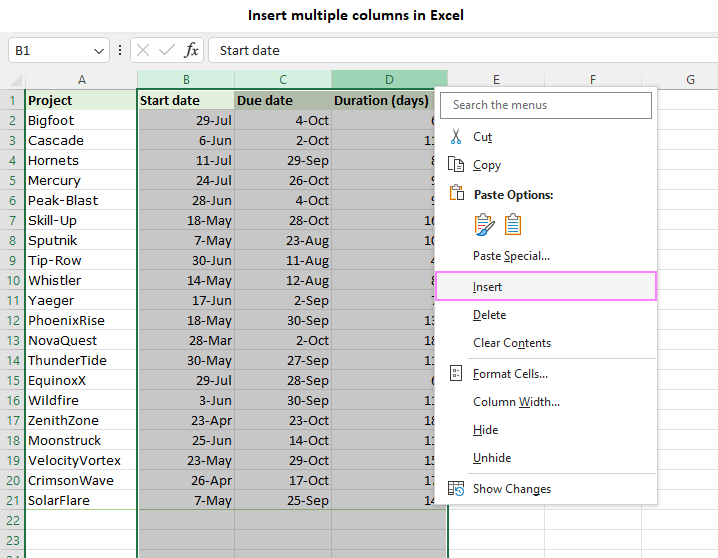
- Select the same number of adjacent columns as the number of columns you want to add. This can be done by dragging the cursor across the column headers. For more information, see How to select multiple columns.
- Right-click on the selected columns.
- Choose the Insert option from the menu.
The selected number of new columns will be immediately added to the left of the selection.
Method 2. Shortcut for multiple column insertion
If you prefer using shortcuts to expedite your tasks, here are the steps to follow:
- Highlight as many columns as the number of new columns you want to add. To do this, select several adjacent cells in a row and press Ctrl + Space together. This will select the entire columns.
- Press Ctrl + Shift + "+" (plus sign on the main keyboard) to insert several new columns at once.
- Optionally, you can press F4 or Ctrl + Y to repeat the last action if you need to add more columns.
With these methods at your disposal, you can swiftly insert multiple new columns in one go, saving time and effort.
Add multiple non-adjacent columns
If you need to insert non-contiguous columns in Excel, proceed in this way:
- Select several non-adjacent columns by holding down the Ctrl key while clicking on the column letters.
- Once the target columns are selected, you have two options to add new columns:
- Press the Ctrl + Shift+ "+" shortcut, or
- Right-click the selection, and then pick Insert from the pop-up menu.
This will insert a new column to the left of each selected column.
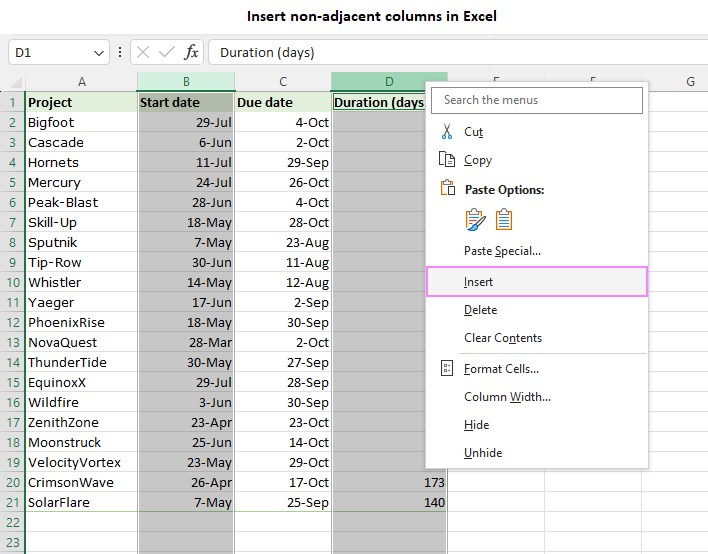
This method is particularly useful when you need to insert multiple columns at specific locations.
How to add column to table in Excel
If your spreadsheet is formatted as Excel Table, you have a handy method to add new columns:
- Select any cell in the column next to where you wish to insert a new column.
- Right-click on the selected cell, and then click Table Columns to the Left. This option is specifically available when working within an Excel table.
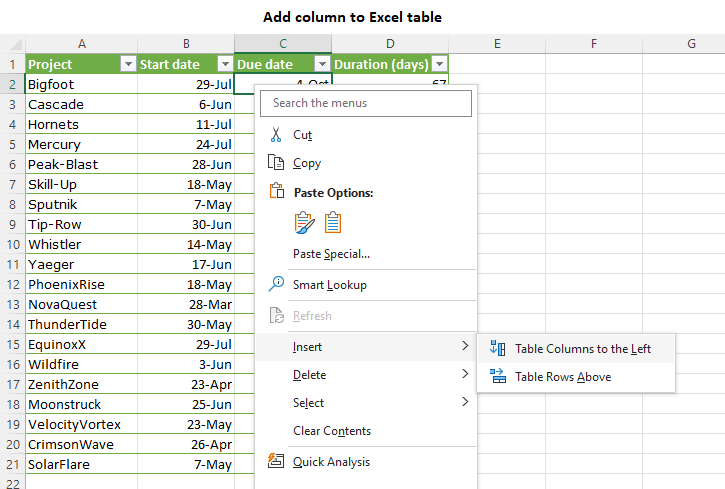
As a result, a new column will be inserted to the left of the selected cell within the table. By default, the new column will be named "Column1." However, you can easily change it according to your preference.
If you select a cell in the rightmost column of a table, you will have two options available:
- Insert Table Columns to the Left
- Insert Table Columns to the Right
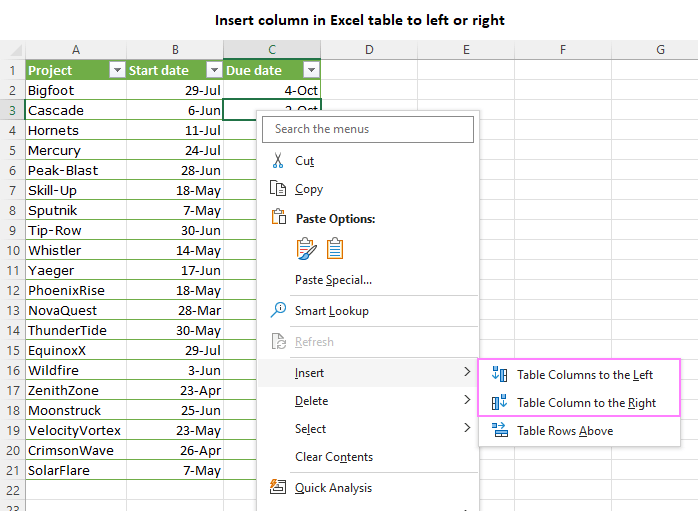
With this functionality, Excel makes it convenient to expand and adjust your table structure based on your needs. For more details, see How to add or remove table columns and rows.
Add a column in Excel by dragging
Aside from the conventional methods of inserting columns in Excel, there is a non-traditional yet practical "drag-and-drop" technique that can be both useful and fun.
- Select any blank column in your sheet by clicking on its header.
- Hover your cursor over the right or left edge of the selected column until it transforms into a four-sided arrow, indicating that the column is ready to be moved.
- Press and hold the Shift key on your keyboard. While holding the Shift key, drag the column to the desired location. As you drag the column, you will notice a green vertical line appearing, indicating the position where the column will be inserted upon releasing the mouse button.
- Release the mouse button to drop the column in the required position.
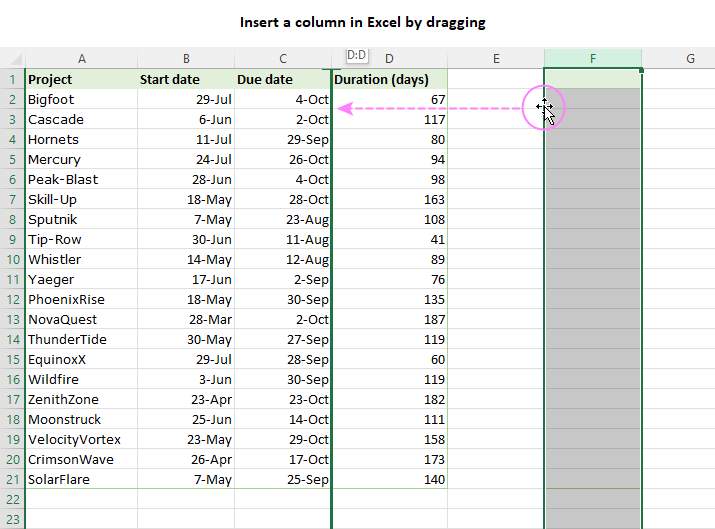
By utilizing this drag-and-drop technique, you can quickly insert new columns in your worksheets while enjoying the interactive aspect of the process :)
Tips:
- This method is particularly useful when you need to swap or rearrange columns in your Excel sheets.
- By holding down the Ctrl key instead of the Shift key while dragging, you can easily copy a column to a new location.
How to insert column in Excel to the right
With traditional methods, columns are inserted to the left of the selected column. But what if you wish to add one or more columns to the right? This can be done using the Fill Handle:
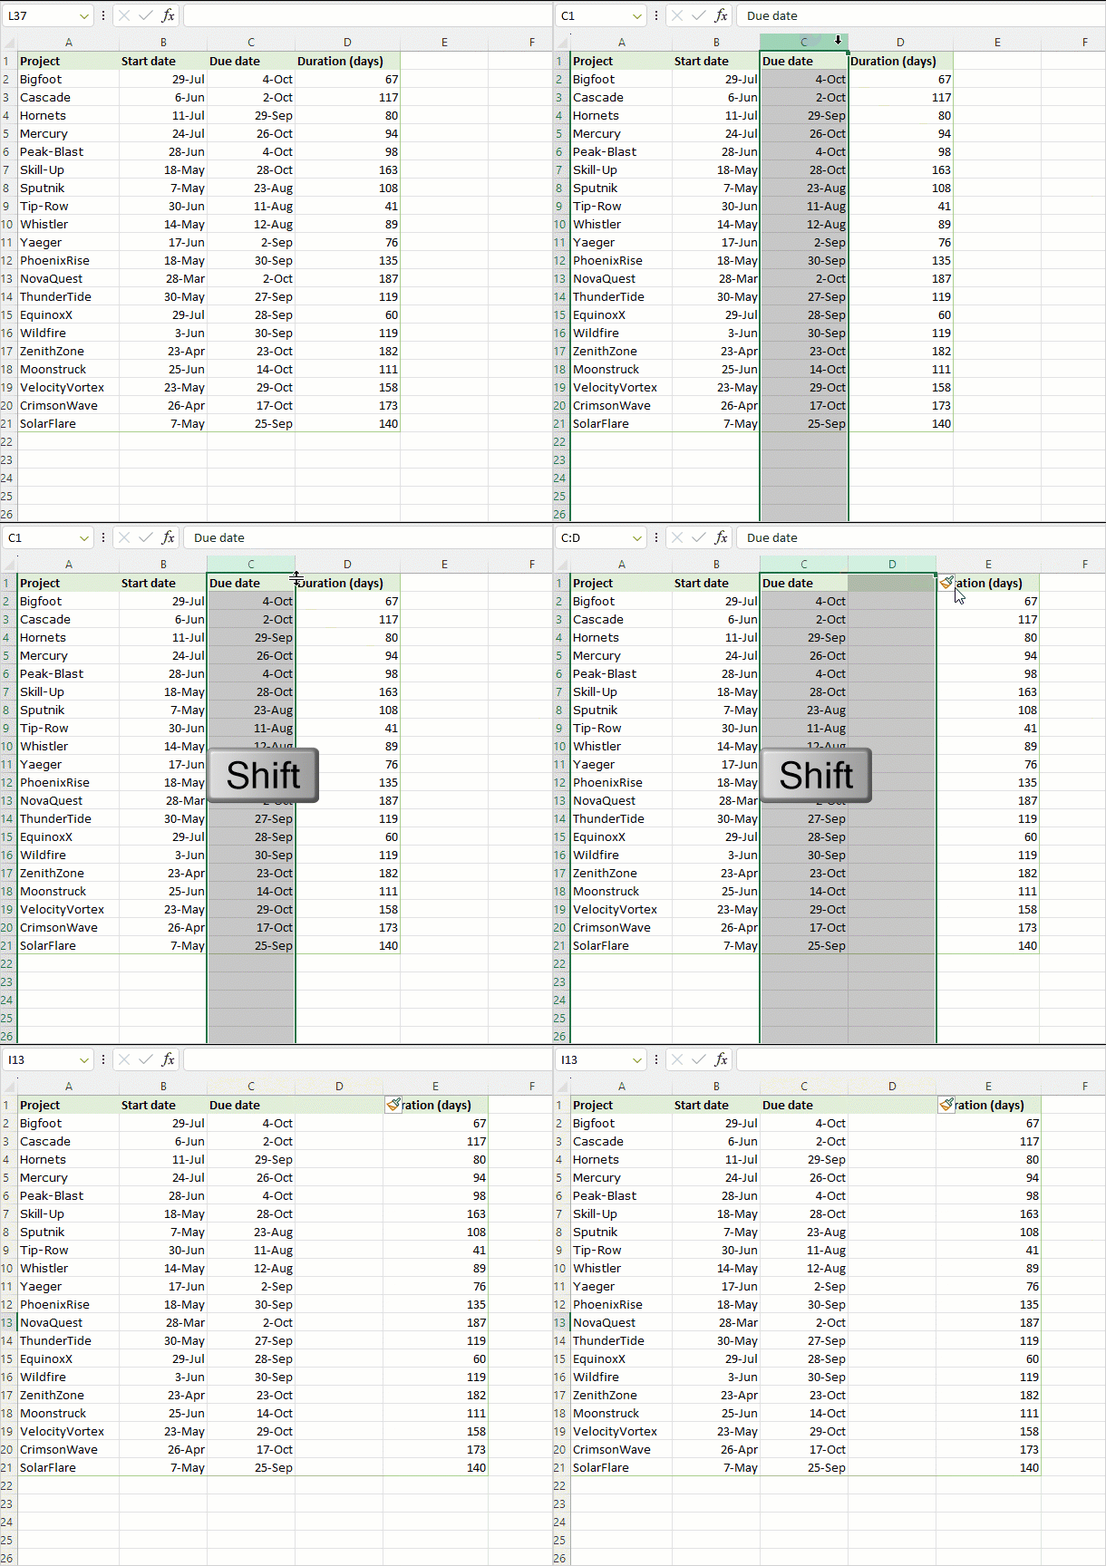
- Select the column to the right of which you want to add a new column(s).
- When the entire column is selected, you will notice a small green square at the top right of the selection. This square is known as the "fill handle."
- Position your cursor over the fill handle, and then press and hold the Shift key on your keyboard. As you do this, the cursor will change to two bars with arrows, indicating that you can insert a column.
- While still holding the Shift key, left-click and drag the fill handle to the right to create as many new columns as you want.
- Release the mouse button.
Done! One or more new columns are inserted to the right of the selected column.
How to insert blank column after every column in Excel
Many Excel users strive to save as much time as possible by automating frequent spreadsheet tasks. If you wish to automatically insert a blank column between every other column in your worksheet, you can utilize the following VBA code:
How to use the macro to insert every other column:
- Add the code to your workbook. For the detailed steps, see How to insert VBA code in Excel.
- Select the range in your worksheet where you want to insert columns.
- Press Alt + F8 to open the macro dialog box.
- Choose the InsertEveryOtherColumn macro.
- Click Run to execute the code.
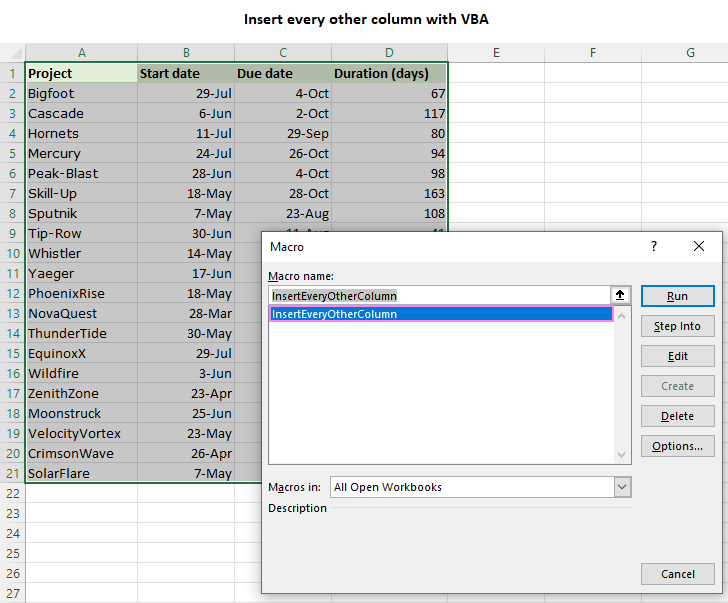
As a result, the macro will automatically insert a blank column after every existing column in the selected range. This lets you quickly and effortlessly organize your data in a desired pattern.
That's how you can add new columns in Excel. Whether you prefer the traditional methods, an interactive drag-and-drop approach, or VBA automation, Excel has got you covered. So go ahead, explore the techniques, and make your spreadsheets truly shine. Happy column inserting!
Practice workbook for download
VBA to insert every other column in Excel (.xlsm file)
 by
by
31 comments
How do I add 2 columns between each column in the selection?
Hi! You can modify the VBA code from the article above to add as many columns as you need.
hello
how i can insert one column in all sheet of workbook together?
thanks for adding columns after each columns
Hi, i would like to add a column after every 7 columns. Is this possible?
Excel: I do not want to insert columns after typing, but to type the pieces of text into the columns in the first place, so that they will not move about when I start typing another piece.
I added did the insert column to the left for my cells that had percentages in them. It automatically does the table with a yellow bar. I cannot figure out how to change the color of that bar. Can someone help me with that? Thanks!
Hello!
If you are using an Excel table, then try these guidelines: Excel table styles and formatting: how to apply, change and remove.
I hope it’ll be helpful.
excel table - I want to insert a column between L & M (to the left) as well as a column at the end (to the right). I am unable to do either - the message is that it would move cells in a table on my worksheet.
If I select column M - right click = insert is grayed out
If I select a cell - choose - insert column I get the above message
Insert Table columns to the left is always grayed out.
What is going on? I thought we could do this before.
Any help would be appreciated
Hello!
Unfortunately, I haven't been able to reproduce this problem myself. Maybe I misunderstood something. Explain in more detail.
Thank you for replying. I've tried everything.
It appears that I can only insert columns in my raw data. Once I define the table the columns can't be inserted. Even deleted formulas but still unable to insert.
This would be a good place for a warning with a Yes / No option rather than not allow it at all.
Cindy
First option does not work :/
Hi, how to code the colFinish to select the last column of my selection instead of excel's last column?
I would like to know how to freeze more than just the upper most row? Sometimes my tables have as many as 3 rows of "headers" or rows above where data starts.
Hi!
You can find the detailed instructions in this example: How to freeze multiple rows in Excel.
Hello!
Please check out this article to learn how to lock multiple Excel rows.
Hope this is what you need.
Thank you for sharing this info. A real time saver! Excel should let us insert a number for # of columns, it just seems like such an obvious thing they overlooked. But thanx for the great tip! How in the world did you ever figure THAT out?
I've seen no answers on how to insert a column to the right. Excel used to have the option to choose insert column right or left, but now you can only insert on the left, which is quite annoying.
Hi,
Unfortunately, now Excel can only insert a column on the left.
Sir, while inserting a column in a working page of a worksheet. If insert a column is done the last required column moves to the next page. What type of command to be given to retain the last column and insert a new column in same page of a working sheet.
Thank you. This solved my problem.
This worked Perfectly! Thanks for posting this.
I have 2500 Data, and I want to Add one row after 10 rows, Can you tell me what should I do in this condition.
Dear Author, This is a great article, but in the Spirit of clarity, please consider the following edit.
Change from this...
1. To insert a column, you need to select the necessary one and right click on it.
...to this...
1. To insert a column, you need to select the necessary one [SELECTING JUST THE COLUMN HEADER CELL] and right click on it.
...and that will work for Excel 2013, because if one selects the whole column itself, then the "insert to the left/right" option does NOT appear, so one has to select JUST the header cell.
HTH.
Thanks and God bless you.
-- Mark Kamoski.
Your tip to select ONLY the column header is exactly what I needed! Thank you!
I am trying to insert the data from a specific column from a table on one sheet (sheet 2) when I select a drop down item on sheet 1 (drop down is header of the column on sheet 2)on another
I want to give name of Inserted columns please suggest how it will be done by VBA for whole sheet.
I am trying to insert a column to the right of the last column in my table, but when I right click on it all it shows is the "insert" tab without any option to the add the column to the left or right. It simply automatically adds the column to the left. How to add a column to the right of the last column in a table?
Have you found an answer to this yet? I've had no luck, and it is extremely frustrating.
I'm trying to insert a large number (366) of sequential rows between two exiting rows in Excel 2016. None of the options in your add-ons do this except to insert every x number of rows. I had a look at the VBA macro (scares the crap out of me) and was wondering if by removing the +1 parameter it would stop the row skipping option. Advice please
no, it has something to do with the colstep (currenlty set to 2, set it to 1)
you do have to define a new counting method