How to use Template Phrases for Outlook

THIS ADD-IN IS RETIRED AND NO LONGER SUPPORTED

With the Template Phrases for Outlook add-in your correspondence becomes more effective.
You can save the most frequently used templates and instantly insert them into your email messages.

Create and edit templates in Outlook

Replying to similar emails on a daily basis you are sure to have the text you can copy and paste to yet another typical email. Instead of this copy-paste routine, you can select the needed text fragment in the message body and save it in the list of your templates in a click.

How to create an email template

You can either create a new template using an existing email or add one from scratch.

Make a new template using text from an existing email

  1. Open the Outlook email that contains text for a new template.
  2. Select the text that will be your template. For example, if you want to create an Outlook signature template, select the corresponding part of the text in your email. In case you need to create an HTML template in Outlook, your message should be in this format.
  3. Click the Plus icon in the add-in pane and select the New template option:
    Click this icon to create a new template.
    It's also possible to right-click the place in the templates tree where you'd like to have the new template and select the New template option from the menu.

    Tip. You can use the Insert key to get a new template in Outlook.
  4. The selected text will be populated in the New template dialog box. By default, the first line of your text becomes the template name:
    The selected text will automatically become a template.
    You can edit the name to quickly find the necessary template when you need it.
  5. Click Save and you will see a new template in the add-in pane.

How to create an Outlook template from scratch

  1. Open a new message window in Outlook so that you can see the add-in's pane.
  2. Click on the New template icon. You will see a dialog box with two fields: the template name and its text.
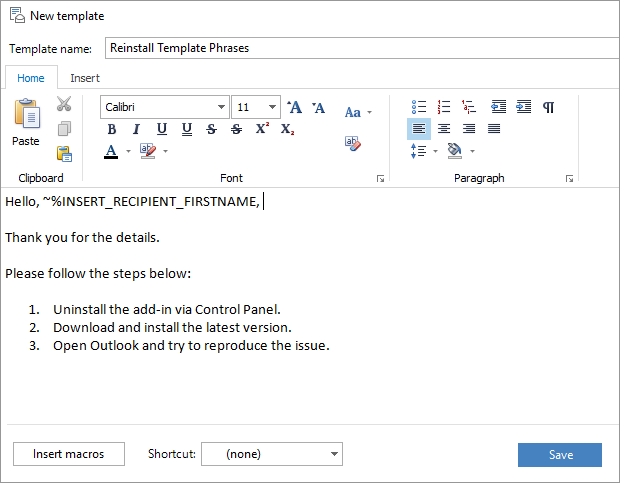
  3. Enter the title for the new template into the Template name field. This can be a short summary that lets you quickly find the template when you need it:
    Enter the template name.
  4. Type the text of the template into the bigger field below.
  5. You can add the necessary formatting. You'll find all basic formatting options on the toolbar at the top of the text box.

    Tip. Right-click the template text to see additional formatting options.
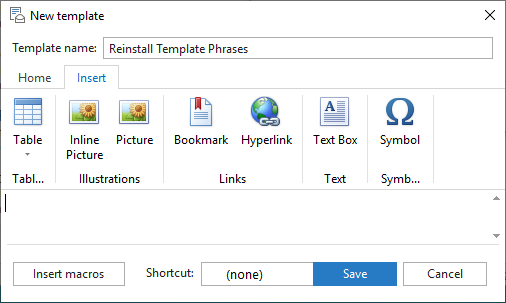
    Tip. Take advantage of the Insert tab to add tables, pictures, links, or symbols to your template:
    Add tables, pictures, links, or symbols to your template.
  6. Click Save and you will see a new template in your template tree.

How to edit email templates

In this part, you'll see how to change a template if necessary.

  1. Select an email template in the templates tree.
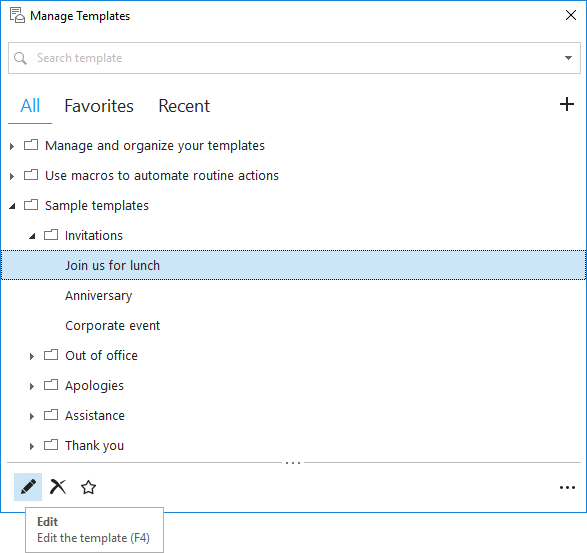
  2. Press the F4 key on your keyboard or the Edit icon in the toolbar:

    Use the Edit option.

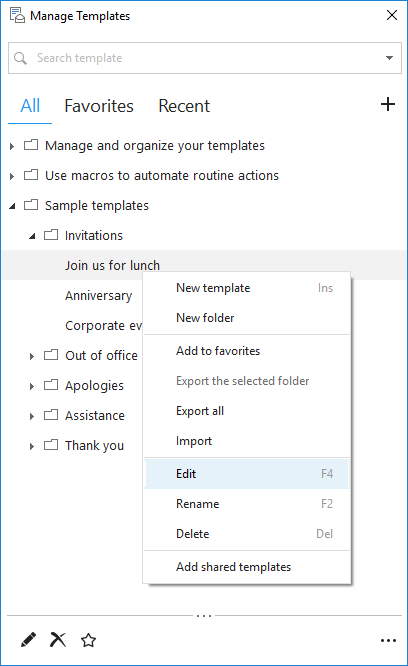
    Also, you can right-click on the template and select the Edit option:

    Right-click and edit the template.

  3. Make the necessary changes and click Save to save the template in Outlook.

How to use macros in your templates

Macros will help you in executing routine operations in Outlook. For example, they allow creating templates with attachments, so that each time you insert a certain template in an Outlook message you don't have to add a particular file. Or using macros you can enter the same address into the TO field; there are many more useful things you can do with template macros:

  1. To insert a macro, select the template in the list and click Edit. It's also possible to add a macro when you are creating a new text pattern.
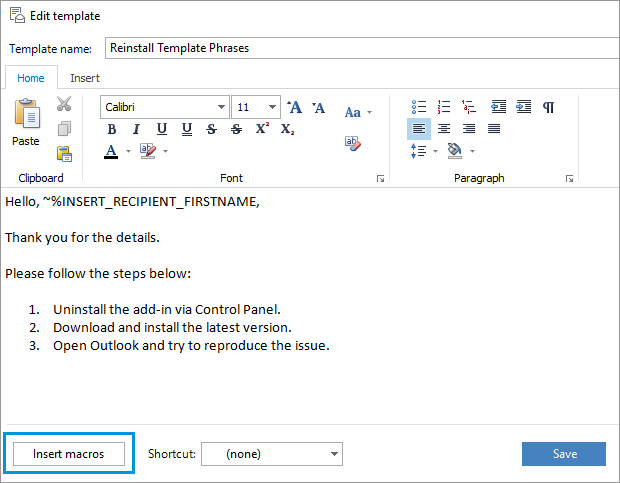
  2. Click on the Insert macros button at the bottom of the Edit template window:
    Open the macros list.
  3. Insert the macros you need into the template.
  4. Click Save in the editor window to save changes.

Macros and their descriptions

~%ADDBCC=
pastes the specified email address/es to the BCC field. If there are any emails entered, they will be kept.

~%ADDCC=
adds the necessary email to the CC field keeping any current addresses.

~%ADDTO=
enters an address you specify into the TO line. It will appear along with any current emails in this field.

~%ATTACHFILE=
With this macro, you can create a template with attachment to automatically insert a file each time you paste the template into Outlook. Once you insert this macro, you'll see the Windows Explorer window where you can browse for the file to be attached. After you select the file and click OK, the macro will contain the file path after =, e.g.: ~%ATTACHFILE=C:\Program Files\Add-in Express\AddIns\Template Phrases for Microsoft Outlook\readme.txt

Now each time you paste this template into an e-mail message, the file will be attached and you'll get a confirmation window about it. You can disable confirmation if you like.

Note. We recommend inserting this macro after the template text. Otherwise, please make sure you start a new sentence from a new line so that it doesn't interfere with the file path.

~%WHAT_TO_ENTER[field label]
prompts you to enter the necessary value every time you insert a template into an Outlook message. For instance, if you insert ~%WHAT_TO_ENTER[Name] into the template, each time you paste it you'll see a dialog box that will let you enter the name.

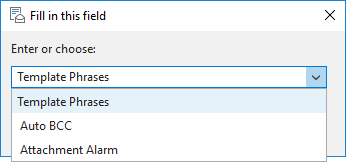
Tip. You can even pre-populate possible values by listing them in square brackets separated by a semicolon; in this case you'll get a drop-down list with them, e.g.
~%WHAT_TO_ENTER[Template Phrases; Auto BCC; Attachment Alarm]:
Get a drop=down list with the values every time you paste the template.
Note. Please note that the pre-populated text cannot contain more than 254 characters.

~%ATTACHMENTS
Use this macro in Outlook template for inserting a list of attachments into the message text. Each time you use a template with this macro, all the attachment names will be listed in the message body.

~%TO
inserts the display name of a contact from the TO field into the of a message body. E.g. you can start a template with "Hi ~%TO," and each time you insert it, the macro will be replaced with the recipient display name, e.g. "Hi James".

~%BCC
inserts the address(es) from the BCC field into the message.

~%BEHALF_OF_NAME
allows entering an email address to automatically send certain emails on behalf of another person.

~%CC
inserts the address(es) from the CC field into the email.

~%CLEAR_SIGNATURE
will be really helpful if you have certain signature pasted automatically, but there are several templates that require a different one. With this macro in your template, the current signature will be deleted and you will not need to do it manually.

~%SUBJECT
inserts the contents of the Subject field into the message.

~%CLIPBOARD
inserts the clipboard item into the message. Please note that this macro pastes only text, it doesn't work with pictures or graphical objects.

~%DATE
inserts the current date.

~%TIME
inserts the current time.

~%FILLTO=
will fill in the TO field with the email address you enter after =, e.g. ~%FILLTO=support@ablebits.com. Please note that any current email address will be deleted.

~%FILLCC= =
will fill in the CC field with the email address you enter after =, e.g. ~%FILLCC=support@ablebits.com. All current addresses in this line will be removed.

~%FILLBCC=
will fill in the BCC field with the email address you enter after =, e.g. ~%FILLBCC=support@ablebits.com. Any current BCC addresses will be removed.

~%FILLSUBJECT=
will fill in the Subject field with the text you enter after =, e.g. ~%FILLSUBJECT=Sample Subject. Now each time you insert the template with this macro into an Outlook message, the subject will be set to the one you entered.

~%FROM_ACCOUNT=
lets you specify the preferred From address. It's possible to enter the email address manually if it's not in your Account Settings. Please note that the behavior of this macro depends on your Outlook and Exchange settings.

~%SELECTED
is for similar e-mails with some text that may vary, like the product name, price, etc. Just highlight the text that needs to be used this time before inserting the template with this macro and ~%SELECTED is replaced with the selection. For example, instead of creating a number of templates like these:

  • Our Template Phrases for Microsoft Outlook is compatible with ...
  • Our Auto BCC for Microsoft Outlook is compatible with ...
  • Our Attachments Alarm is compatible with ...

We create just one template:
Our ~%SELECTED is compatible with Microsoft Outlook 2019, 2016, 2013-2010.

So when we reply to a question about the compatibility of the Template Phrases with Outlook, we copy the add-in's name from the customer's question, paste it to our reply message and highlight it.

Then we double-click on the template and get:
Our Template Phrases is compatible with Microsoft Outlook 2019, 2016, 2013-2010.

~%INSERT_RECIPIENT_FIRSTNAME
inserts the first name of the recipient if their contacts are saved in Outlook Contacts (the panel in the lower-left corner of your Outlook). Otherwise, the email address is inserted.

~%INSERT_RECIPIENT_LASTNAME
insert the last name of the recipient into a message if their contacts are saved in Outlook Contacts. Otherwise, the email address is inserted.

~%INSERT_RECIPIENT_FULLNAME
inserts the full name of the recipient if their contacts are saved in Outlook Contacts. Otherwise, the email address is inserted.

Note. Please note that the above three macros retrieve the recipients' names from the TO and CC fields. If you want to insert the names of only recipients indicated in the TO field, please use the three macros below.

~%INSERT_RECIPIENT1_FIRSTNAME
inserts the first name of the recipients that are indicated in the TO field if their contacts are saved in Outlook Contacts (the panel in the lower-left corner of your Outlook). Otherwise, the email address is inserted.

~%INSERT_RECIPIENT1_LASTNAME
insert the last name of the recipients that are indicated in the TO field into a message if their contacts are saved in Outlook Contacts. Otherwise, the email address is inserted.

~%INSERT_RECIPIENT1_FULLNAME
inserts the full name of the recipients that are indicated in the TO field if their contacts are saved in Outlook Contacts. Otherwise, the email address is inserted.

~%INSERT_TEMPLATE[]
lets you enter a name of a template in brackets and insert it within and another template. Then if you change the source template, this macro will automatically paste the updated version so that you don't need to change it in each text snippet.

~%SWITCH_TO_HTML
converts your email to the HTML format when you insert the template.

~%CURSOR
will position the cursor at the needed place within your message. For example, after Hello, so that you can instantly enter the name of the recipient.

~%INSERT_RECIPIENT_LASTNAME
inserts the last name of the recipient if their contacts are saved in Outlook Contacts.

Tip. If you want to insert the recipient's name that is not in your Outlook Contacts, use the ~%TO macro.

~%REQUEST_DELIVERY_RECEIPT
will automatically request a delivery receipt for your email.

~%SET_HIGH_IMPORTANCE
will automatically set message importance to High.

~%SET_LOW_IMPORTANCE
will automatically set message importance to Low.

Paste a template into the message

You can use a specific template in your email, assign a shortcut to a template, use templates automatically, or select a paste option.

Use a specific template in your email

If you need to reply to a message using a particular email template, you can choose one of the following ways:

  1. Double-click on the email template in the tree.
  2. Select a template and click the Paste icon to the left of it.
  3. Select a template in the template tree and click the Paste icon in the toolbar.
  4. Select a template in the template tree, right-click it, or click on the icon with 3 dots to the right of it and select the Paste option.

Assign a shortcut to an Outlook template

You can easily assign a keyboard shortcut to a specific template and have it inserted into the message by pressing a hotkey.

  1. Select the email template in the list and click Edit.
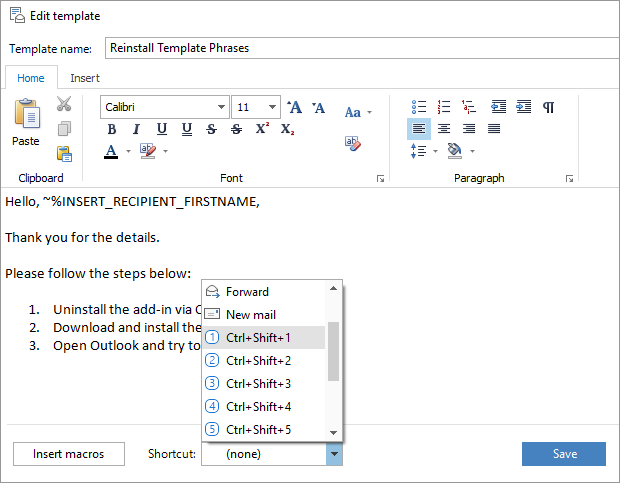
  2. Click on a little arrow next to the Shortcut: field at the bottom of the Edit template window:
    Assign a shortcut to your template.
  3. Select a shortcut for the template from the drop-down list. There are 10 shortcuts available from Ctrl+Shift+9 to Ctrl+Shift+0.
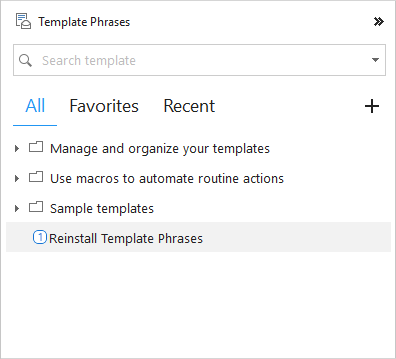
  4. Click Save in the Edit template window to confirm the changes. The templates with shortcuts are marked with numbers from 1 to 10 in the template tree:
    A list of template shortcuts.

    Tip. To remove a shortcut to a template in Outlook, edit the template and select None in the Shortcut: field.

Insert templates automatically when you create a message

There is an even easier way to use your email templates in Outlook - assigning a special shortcut to your template: New, Reply, Reply to All or Forward.

Such templates will be inserted automatically when you create a new message, write a reply, etc.:

  1. Select the template in the list and click on the Edit icon.
  2. Click on a little arrow next to the Shortcut: field at the bottom of the Edit template window:
    Assign a shortcut to your template.
  3. There are 4 special shortcuts you can choose from the drop-down list:

    • Select New if you'd like the template to be inserted into all new email messages by default.
    • Select Reply if you want the template to be inserted into all replies you create.
    • Choose Reply to All if you need the template each time you click Reply All.
    • Select Forward for the template to be available in all forwarded messages.

    Pick the shortcut you need.

  4. Click Save to confirm the changes. The templates with shortcuts are marked with the respective message icon in the template tree so that you can reply using a specific template in a click!

Specify the template text format

To save your time on applying the same formatting to the email text, you can use the Paste Options button.

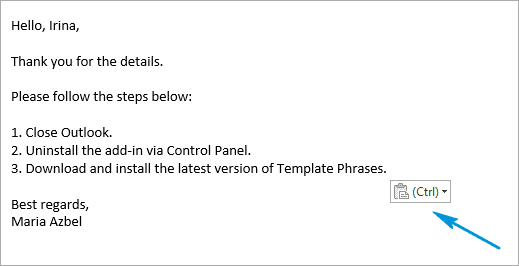
  1. Insert a template into an email and see the Paste Options button below a block of pasted text:
    Click this button to select a paste option.
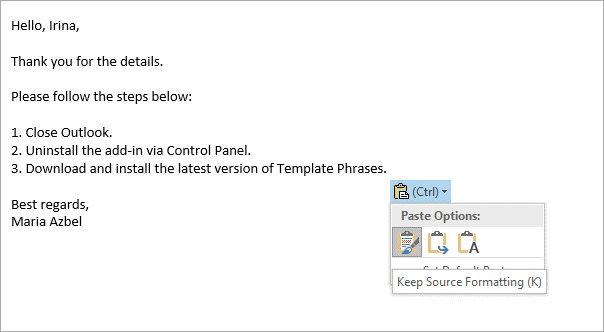
  2. Click the button to find a list of options and specify how Template Phrases needs to paste the information into your document:
    Paste options.

The available options depend on the type of content you are pasting and the format of the text where you are pasting.

Tip. You can set the default paste option for your templates. Click on the Paste Options button -> click Set Default Paste -> Cut, Copy, and Paste -> Pasting from other programs. Pick the correct formatting option from the drop-down list.

Thus, Template Phrases gives you a number of handy ways to insert the template text the way you need.

How to manage templates tree in Outlook

Here you will learn how to create a new folder in the templates tree, edit folder names, delete a template, and move templates and folders.

Create a new folder in the templates tree

If you use email templates in Outlook on a daily basis, you should have dozens of them. So it can be a good idea to organize them into folders.

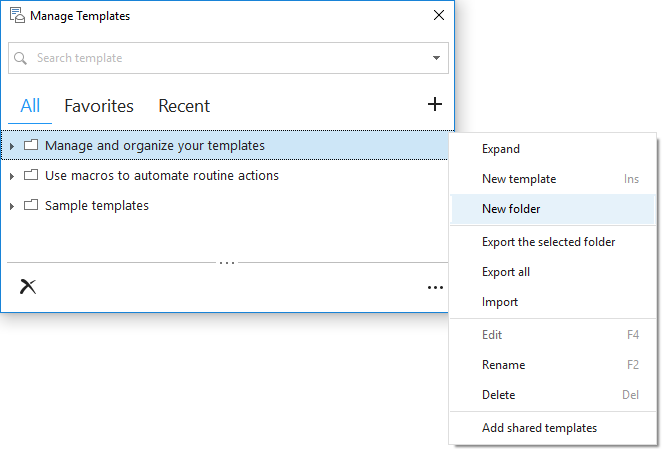
  1. To create a new folder in the template tree, select the place in the template tree where you want to have it, and click three dots on the right side of the pane:
    Create a new folder.

    In the drop-down menu, select the New folder item:
    Create a new folder in the template tree.

    You can also right-click the place in the templates tree where you'd like to have the new folder and pick New folder.

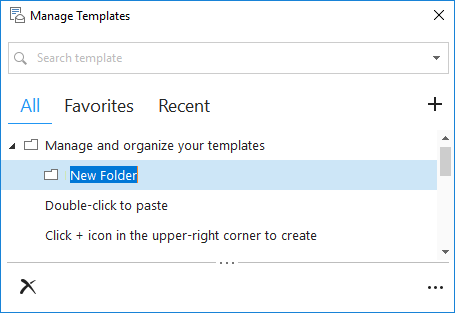
  2. Right in the tree, enter the new folder name:
    Name a new folder.

Edit folder names

  1. Select a folder in the list.
  2. Press F2 or right-click the folder and select Rename in the drop-down menu:
    Edit folder name.
  3. Enter a new folder name and press Enter.

Delete a template in Outlook

Select a template or a folder you want to delete and press the Del key or the Delete icon in the Outlook Template Phrases toolbar:
Delete a template.
You can also right-click on the folder or template and select the Delete option.

Note. The folder will be deleted permanently with all its templates and subfolders.

Move email templates/folders

To change the position of an email template or folder, just drag and drop it to the place where you want it to be.

If you want to rearrange or organize lots of Outlook templates and folders, benefit from the Manage Templates option:

  1. Open Outlook and go to the Ablebits.com tab.
  2. Click on the Manage Templates icon.
  3. The Template Phrases pane will open in a new window.
  4. You can change the size of this window and organize or rearrange the text templates the way you like.

Share templates

You can create company-wide templates, work with shared Outlook templates, and protect them.

Create company-wide templates

You can create shared templates that you can use and improve together with your colleagues straight in Outlook. Company-wide templates are stored on a shared network drive so that other people can add this folder to their template tree and use it along with their own texts. This feature is great for sales or support teams.

Note. Before exporting and importing the Shared templates folder, please make sure that all users of companywide templates have the same version of the program. You can check it if you click in the About icon on the add-in pane:
Click the About icon.
  1. Create a folder with the Outlook templates you want to share.
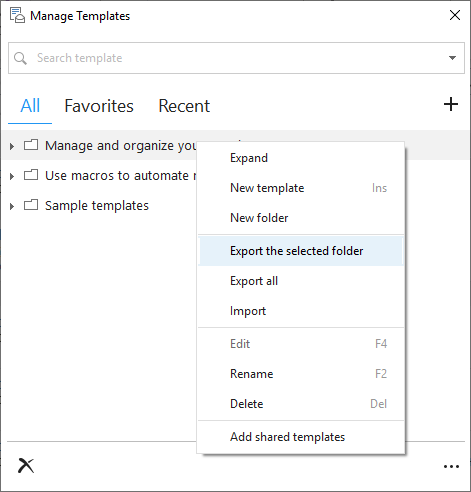
  2. Select the folder, right-click it and select the Export the selected folder option:
    Export the selected template folder.
    You can also right-click the folder in the template list and select the Export the selected folder option.
  3. Save the .DATA file to any location accessible by all users who need to work with the shared templates.

Work with shared Outlook templates

Follow these steps when your Outlook templates are in a shared network drive.

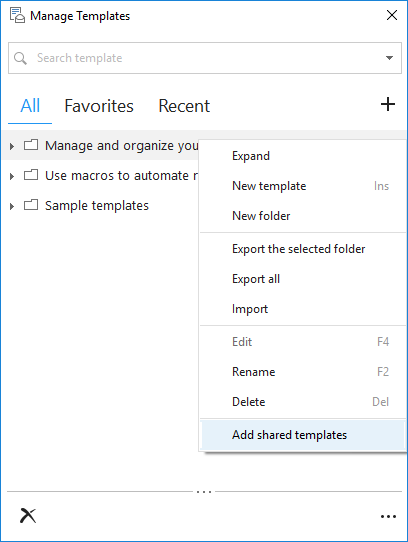
  1. Select the folder, right-click it, and select the Add shared templates option:
    Add shared templates in Outlook.
  2. Browse for the file with shared templates, select it, and click OK.
    You will see the folder with shared templates at the end of your template tree. Any changes you make to these templates will be available to all users.

If your shared templates folder is stored in Dropbox or OneDrive, the other users need to make sure the folder is synced up to their local disc and reopen the Template Phrases pane.

Note. It's possible to add more than one shared folder.

Protect company-wide templates from changing in Outlook

When you share Outlook templates, it can be a good idea to protect them from any changes, accidental or not. By default, you can edit Shared Templates the same way you edit your own. If you want to keep templates stored on a shared network drive, please set the read-only attribute for the file:

  • Right-click the file with shared templates in Windows Explorer and select Properties.
  • You'll see the Read-only checkbox at the bottom of the window; select it and click OK.

You can also set Permission level to Read only for the folder that contains the file.

Once you do this, your file with the shared templates will become read-only.

Back up and transfer your templates

Learn how to back up your Outlook templates and copy and back up template folders.

Easily back up your Outlook templates

If you ever happen to lose your Outlook email templates, you can easily restore them with the backup option. You can export the existing email templates and import them into your computer if you lose your templates or get a new PC.

How to export email templates

  1. To transfer Outlook templates, you need to export your folder to the .DATA file. To do that, right-click any item in the pane and pick the Export all or the Export the selected folder option:
    Export the selected folder in Outlook.
  2. Browse for the location of your choice, enter a file name, and click OK.

How to import templates

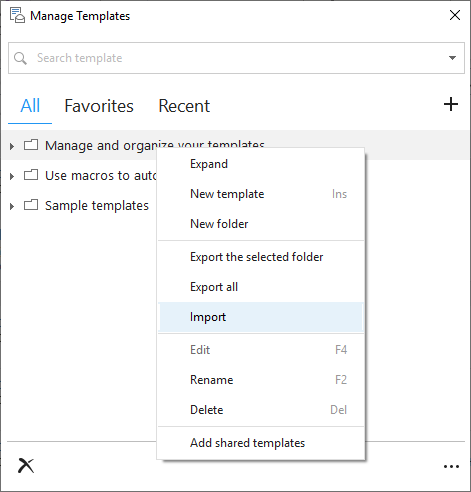
To import your templates, right-click the folder that will contain the transferred templates in the list and select the Import option. The templates will be imported into the selected folder and placed at the end of the list:
Import your template text to a folder.

Copy and back up the folder with your Outlook templates

You can retrieve your lost or deleted template file in Outlook 2019 - 2010.

The folder with your templates is stored here:

  • If you have Windows 7 or Vista:
    C:\Users\USER ACCOUNT\AppData\Roaming\Add-in Express\Template Phrases for Microsoft Outlook\
  • If you have Windows XP:
    C:\Documents and Settings\USER ACCOUNT\Local Settings\Application Data\Add-in Express\Template Phrases for Microsoft Outlook\

If Application Data or AppData Folder is hidden, please do the following:

  1. Select Tools->Folder Options... in the Explorer menu.
  2. Go to the View Tab.
  3. Click Show hidden files and folders, click OK.

If you lose your templates, please follow these steps:

  1. Close Outlook.
  2. Place the backed up folder with your email templates to the same location on your PC.
  3. Start Outlook - your templates should be recovered.

How to find templates in Outlook

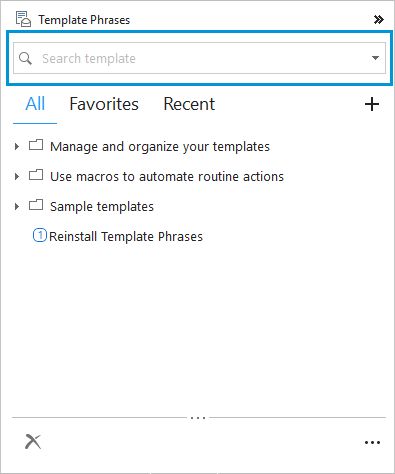
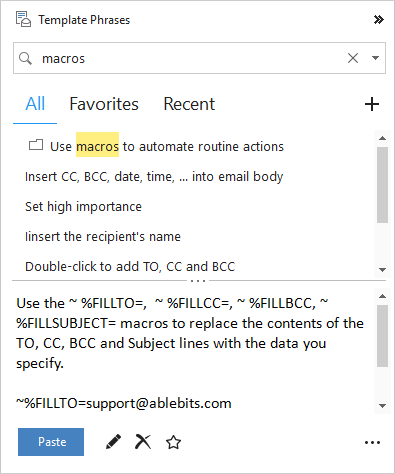
The Search field allows you to find the correct text snippet in seconds without scrolling up and down the template tree:

  1. In the Search field, type the keyword(s) that appear either in the title or in the body of the template you are looking for:
    Enter your keyword.
  2. As you type, all matching templates are listed in the Template Phrases pane:
    Find the templates easily.
  3. Your search entries are saved. If you want to find Outlook templates you looked for earlier, you can access them by clicking a little arrow next to the Search field.
Note. You can specify the number of saved search entries and clear the list in the Search options.

You can paste, edit, delete templates and add or remove them from favorites.

How to work with favorite templates in Outlook

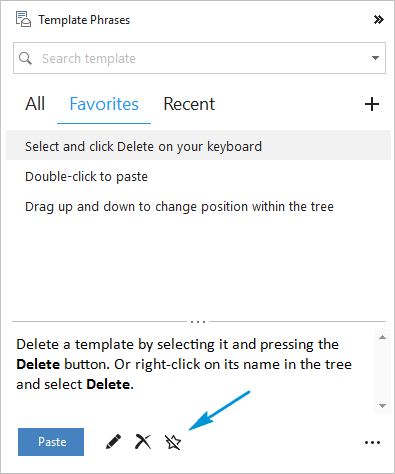
When you use templates in Outlook every day, it can be handy to pick favorite templates and arrange them the way you like: have them all in one folder or organize them into any number of folders. You can even create a shortcut to your favorite Outlook templates.

  1. If you want to use a template as favorite, select it in the templates tree or in the list with the search results.
  2. Click the Add to Favorites icon in the Template Phrases toolbar:
    Add a template to Favorites.
    The template will be added to the list in the Favorites tab.
  3. To delete a template from Favorites, click the Remove from Favorites icon or right-click the template and select the Remove from Favorites option:
    Remove a template from Favorites.

How to manage the Template Phrases options

Here you can learn how to take advantage of the Template Phrases options.

Pane options

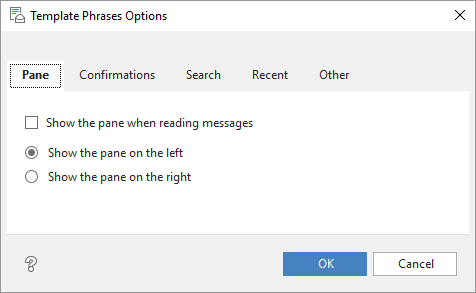
The Template Phrases pane is also available when you are just reading messages. Thus, you can create email templates based on the messages already written and sent by you or your correspondents.
Do the following to see the Templates pane in all types of messages:

  • Click on three dots at the bottom left corner of the pane and choose Options from the menu list:
    Open the Options window.
  • Open the Pane tab in the Template Phrases Options window:
    Open the Pane tab.
  • Check Show pane when reading messages and click OK.
  • If you want to change the position of the pane in your messages, select the Show the pane on the left or Show the pane on the right radio button and click OK.

Disable and enable confirmations

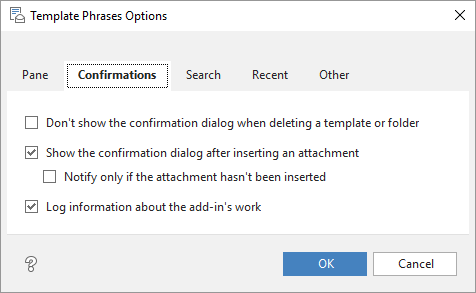
When working with the templates for Outlook, you may see two confirmation dialog boxes: one asking if you are sure you want to delete a template or a folder and the other letting you know if the ~%ATTACHFILE= macro worked and if the file was added. You can disable or enable these confirmations:

  1. Open the Options dialog box.
  2. Open the Confirmations tab:
    Open the Confirmations tab.
  3. Select the checkbox next to the confirmation to disable it or unselect the checkbox to enable the confirmation and click OK.
  4. For diagnostic purposes, Template Phrases for Outlook contains an option that turns on the logging of the add-in's work. To enable logging, just tick off the Log information about the add-in's work checkbox.

Search options

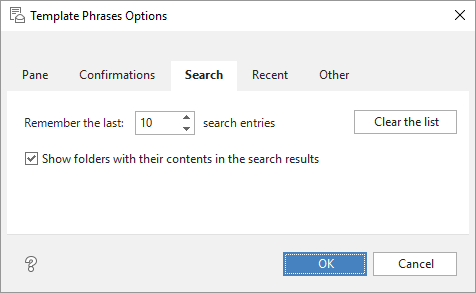
You can specify the number of saved search requests and clear the list:

  1. Open the Options dialog box.
  2. Open the Search tab:
    Open the Search tab.
  3. You can specify the number of search requests to be saved in the Remember the last... field; just enter the number or click the up and down arrows next to it.
  4. If you want to delete all previous search requests, pick Clear the list and click OK.
  5. When you search a template, you can choose to either find texts and folder names that contain the key words, or display folders that have the key words along with their contents. Check Show folders with their contents in the search results for the second option.

Recent templates options

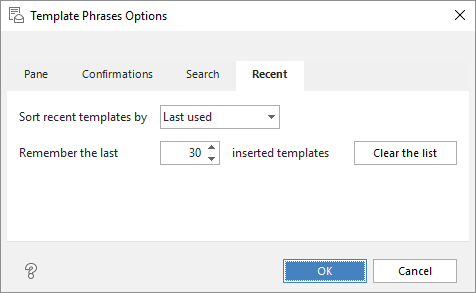
The most recently used Outlook templates are added to the Recent tab automatically. You can clear the list, specify the way you want to sort the templates and define the number of templates you want to see in this tab:

  1. Open the Options dialog box.
  2. Open the Recent tab:
    Open the Recent tab.
  3. You can sort the recent templates by a frequency of use, name or simply by last used ones. Just select one of the criteria from the drop-down list.
  4. You can specify the number of recent template texts you see in the Remember the last... field; just enter the number or click the up and down arrows next to it.
  5. If you want to delete all the Outlook template texts that you see listed in the Recent tab, pick Clear the list and click OK.

The Other tab

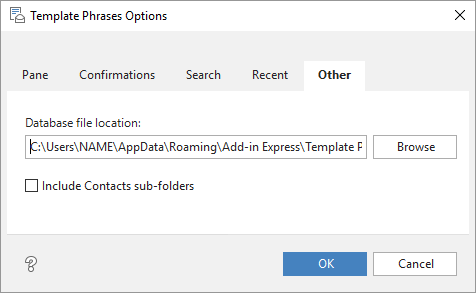
Click the Other tab to select the database file location. It may be helpful if you want to store your templates in a Cloud drive and need to easily access it from any place:
Database file location.

Check the Include Contacts sub-folders box to let the add-in macros process email addresses from subfolders and custom contact lists.

Responses

I switched from Template Phrases to Shared Email Templates. The only issue is when I export from Template Phrases it will save to .DATA file. But you can not import .DATA in Shared Email Templates cause it only accepts XML or PTD.
Is there a solution to convert the DATA file?

Hello, is there a way to add pictures and/or tables into a template? Thank you.

Hello Edyta,

Thank you for your question. I recommend looking at our new Shared Email Templates add-in that has much more advanced functionality. It allows inserting pictures from different platforms, as well as tables and datasets. If you are interested, please install the add-in following these instructions: https://www.ablebits.com/docs/outlook-shared-templates-installation/
BTW, you can find our manuals and tutorials here: https://www.ablebits.com/docs/#shared-email-templates-outlook

Hi I was just wondering if there is a way this could work?

~%WHAT_TO_ENTER[~%INSERT_TEMPLATE[Template 1];~%INSERT_TEMPLATE[Template 2];~%INSERT_TEMPLATE[Template 3]]

This would be very useful to chain templates.

Thanks

Hi Ty,

Thank you for your question. I would recommend taking a look at our brand-new Shared Email Templates. There you can give shortcuts to any templates you need (for detailed instructions, please visit this page) and use them in combination with the ~%WHAT_TO_ENTER macro. This is an example of the required HTML code line: ~%WHAT_TO_ENTER[##Template1;##Template2;##Template3;{title:"Choose template"}]

If you have any other questions, please feel free to email us at support@ablebits.com.

The addon stopped working in outlook desktop. I had it working for months but it recently cleared out all the templates and the panel is blank. I cannot click on new or the arrow or the ellipsis. When I click on AbleBits it sends me to the website. I've reloaded the addon, updated windows 10 and outlook, it came back briefly and I was able to send a few emails with the template but it has stopped working. Im unsure how to fix.

Windows 10 has been out for a number of years. The appdata location is not correct using the Windows 7 instructions. I'm trying to find my folder but it's not visible.

Hello Phil,

You can access the folder that contains the file with your templates right from the add-in:

  • Open the tool, click the icon with three dots at its bottom right corner and select Options.
  • In the next dialogue window, proceed to the tab called Other.
  • There you'll see a full path to the destination folder. Click Browse and the folder will be opened.

If you need any further assistance, please email us to support@ablebits.com. Thank you.

I have the same problem as Zoltan since around the same time on multiple computers.
Template Phrases is enabled via the office365 administrator for all users and it just stopped working.

Maybe a windows update has caused the addon to no longer work? It simply wont show the saved templates anymore making the addon useless.

any suggestions on how to fix this?

I lost all my template. The New button won't do anything, cannot open the options menu, the Templates tree is empty. Is there a solution?

Edit: The Add-on is working online but still blank on my PC in the Outlook (Office 365).

Is there a format using the macros to prompt to select a Contact's information into the message?
I want to be prompted which Contact I want to be added into the email message.

Example:

Template Phrases has Contact_001, Contact_002, ..., Contact_100

Contact_001 => Jane Doe
111 Main St.
Anywhere, USA
P#: 111-222-3333
M# 444-555-6666

Hello John Doe,

I have reached out to the person whom you need to speak with. There contact information is bellow.

PROMPT to enter Contact Phrase here, either by name of Template or preferably a drop down selection.

Hello Jim,
Thank you for contacting us.

Unfortunately, there is no such macro to help you with your task. There is a ~%INSERT_RECIPIENT_FULLNAME macro that adds the full name of the recipient if their contacts are saved in Outlook Contacts and ~%WHAT_TO_ENTER[] macro that prompts you to enter the necessary value every time you insert a template that can partially help.

Please find the full list of available macros here.

Peter Langford says:
September 17, 2018 at 7:21 am

Hi Teh Viewing pane is now dispalying separate to the outlook email.
Is there a setting of fix for this?
many thanks
Peter

Hi, Peter,
Thank you for your question! I'm really sorry that you are having difficulties with our add-in.
This week we have published the new version of Template Phrases for Outlook where some issues were fixed, including the one you described. Please install the latest update, version 2018.1.96.7276, and check if you have the same problem with the new version.
Please do the following:
1. Uninstall the current version of the add-in via Control Panel -> Programs and Features.
NOTE: please make sure to copy the templates.data file to some location on your PC in order not to lose your templates during re-installation. By default, the file with your templates is stored in the following folder:
C:\Users\USER_NAME\AppData\Roaming\Add-in Express\Template Phrases for Microsoft Outlook
2. Download and install the latest version of Template Phrases using this direct link:
https://www.ablebits.com/files/get.php?addin=ol-template-phrases
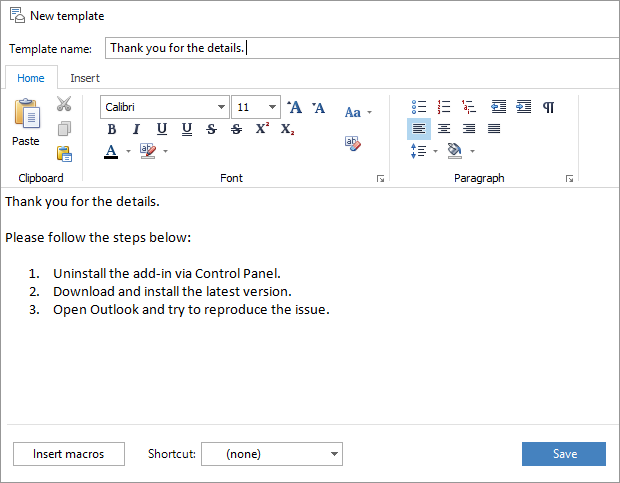
3. Open Outlook and try to reproduce the issue.

If you are still facing the same problem, please contact our support team at support@ablebits.com

Post a comment

Seen by everyone, do not publish license keys and sensitive personal info!
If you have any questions or issues with this add-in, please feel free to post your concerns in the comments area. As soon as we answer, a notification message will be sent to your e-mail. If you do not want to share your thoughts in public, please contact us at support@ablebits.com.